Deploying Storage Spaces on Azure VMs: A Guide to Optimal Performance and Cost Efficiency
Storage Spaces is a robust feature in Windows Server that pools multiple physical disks into a single virtual disk. This setup can be beneficial for various reasons including increasing storage capacity, improving performance, and taking advantage of Azure host caching on larger disks.
Prerequisites
- Azure VM with at least Windows Server 2012.
- Disks should be minimum 4GB in size.
- RDP access with local admin rights.
- Azure portal access with permissions to create and manage disks.
Objective
To configure multiple Azure managed disks into a single virtual disk within an Azure VM for enhanced performance without the worry of disk redundancy.
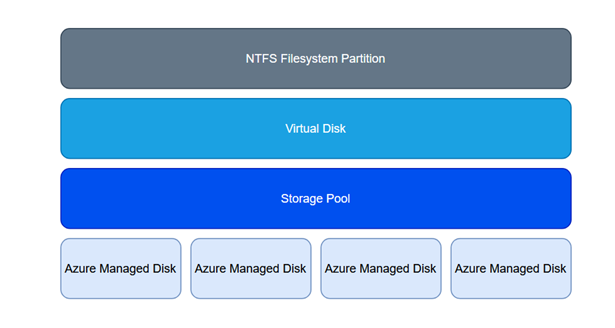
Using four 256GB Premium SSD disks with read-only caching, this tutorial will guide through the process.
Choosing the Right Caching
- Set caching to none for applications where data integrity is critical.
- Use Read Only caching for read-intensive operations.
- Choose Read-Write caching if data consistency is not a priority.
- When unsure, opt for Read Only caching.
Setting up Storage Spaces
Step 1: Connect via RDP and Prepare Disks
Access the Primordial Pool in the Server Manager of your Windows Server. Avoid using it directly; instead, add these disks to user-defined pools.
Step 2: Create a New Storage Pool
Execute the following PowerShell command as Administrator:
New-StoragePool –FriendlyName "YourPoolName" –StorageSubsystemFriendlyName "Windows Storage*" –PhysicalDisks (Get-PhysicalDisk –CanPool $True)
Replace "YourPoolName" with your desired name.
Step 3: Create a Virtual Disk (VDISK)
Run the following command to initialize and set up parameters:
New-VirtualDisk -StoragePoolFriendlyName "YourPoolName" -FriendlyName "YourVdiskName" -NumberOfColumns 4 -Interleave 64KB -ResiliencySettingName Simple -UseMaximumSize
Be sure to replace "YourPoolName" and "YourVdiskName" with your specific names.
Key Parameters
- Number of columns: Corresponds to the number of disks.
- ResiliencySettingName: Should be ‘Simple’ for Azure VMs.
- Interleave: Adjust based on workload; start with 64KB.
- Usemaximumsize flag: Allocates the maximum available size.
Once the VDISK is created, you’ll see it under the Microsoft Storage Spaces Controller in Computer Management.
Initialize this disk with a GPT partition table and form a simple volume, starting with a 64KB allocation unit size.
Optional: Benchmarks
Use the DiskSpd tool to measure performance. Download and execute the following script:
$client = new-object System.Net.WebClient
$client.Proxy = [System.Net.WebRequest]::DefaultWebProxy
$client.Proxy.Credentials = [System.Net.CredentialCache]::DefaultCredentials
[Net.ServicePointManager]::SecurityProtocol = [Net.SecurityProtocolType]::Tls12

$client.DownloadFile("https://github.com/microsoft/diskspd/releases/download/v2.1/DiskSpd.ZIP","C:\Temp\DiskSpd.zip ")
Expand-Archive -LiteralPath C:\Temp\DiskSpd.zip -DestinationPath C:\Temp\DISKSPD

# Set path to your disk below
diskspd.exe -c2G -w50 -b64K -o32 -t4 -d600 -Sh F:\testfile.dat
This will benchmark the disk for its performance capabilities.
Cost Implications
Utilizing multiple smaller disks might offer higher throughput at a lower cost than using larger disks singularly. Evaluate your needs and calculate costs accordingly.
By employing Storage Spaces in Azure, you gain high flexibility, increased performance, and potentially lower costs, making it an excellent strategy for managing large-scale storage solutions effectively.