Configuring OSPF in Microtik
This is how lab setup looks like:
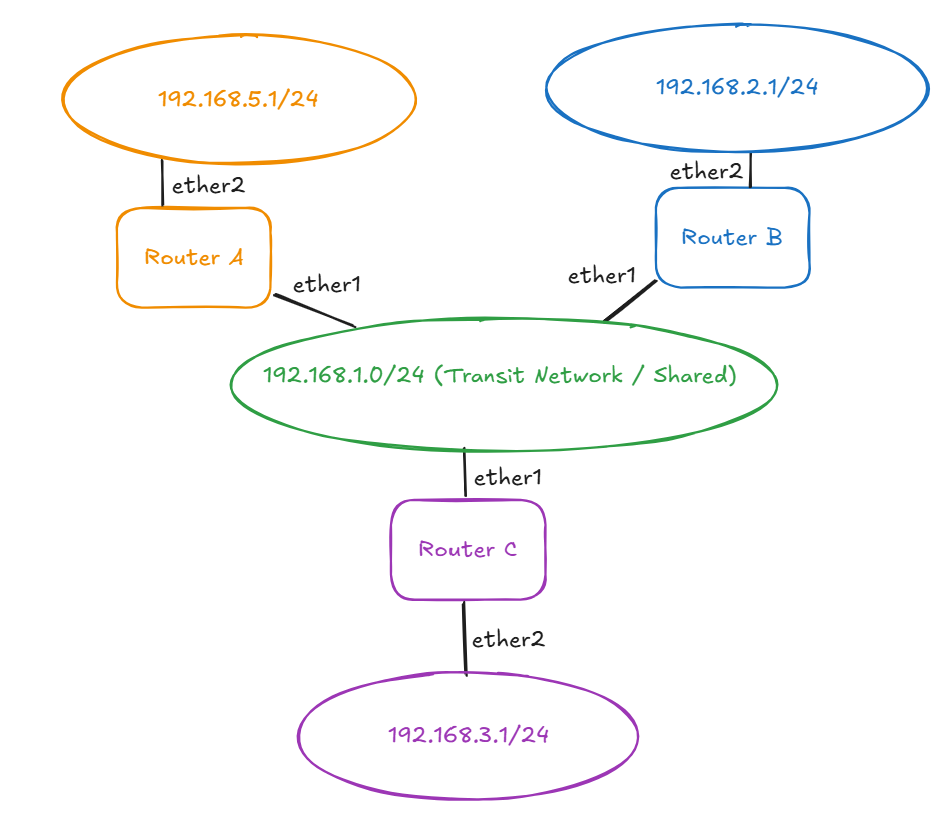
0.Do this on every router (A/B/C): basic IP addressing
0.1 Router A
/ip address add address=192.168.1.254/24 interface=ether1 comment="Transit" /ip address add address=192.168.5.1/24 interface=ether2 comment="LAN behind A"
0.2 Router B
/ip address add address=192.168.1.253/24 interface=ether1 comment="Transit" /ip address add address=192.168.2.1/24 interface=ether2 comment="LAN behind B"
0.3 Router C
/ip address add address=192.168.1.252/24 interface=ether1 comment="Transit" /ip address add address=192.168.3.1/24 interface=ether2 comment="LAN behind C"
1. Firewall / NAT “clean and scalable” (run on every router)
1.1 Add LAB_NETS address list
/ip firewall address-list add list=LAB_NETS address=192.168.2.0/24 comment="Behind B" add list=LAB_NETS address=192.168.3.0/24 comment="Behind C" add list=LAB_NETS address=192.168.5.0/24 comment="Behind A"
1.2 Allow LAB ↔ LAB forwarding
Put this above any forward drop rules (on a clean router, it’s fine anywhere).
/ip firewall filter add chain=forward src-address-list=LAB_NETS dst-address-list=LAB_NETS action=accept comment="Allow lab subnets to talk"
1.3 If you use masquerade later: prevent NAT between LAB subnets
This is safe to add even if you don’t have NAT yet.
/ip firewall nat add chain=srcnat src-address-list=LAB_NETS dst-address-list=LAB_NETS action=accept comment="No NAT between lab nets" place-before=0
2) OSPF with UNICAST on transit (NBMA) + passive LANs
We’ll create:
- one OSPF instance named
LAB - backbone area
0.0.0.0 - interface templates:
- Transit (192.168.1.0/24) as NBMA (unicast)
- LAN behind router as passive
- static neighbors (unicast peer list)
- (Optional) set priorities so A is always DR (predictable)
2.1 Router A: OSPF config
/routing ospf instance add name=LAB router-id=192.168.1.254
/routing ospf area add name=backbone area-id=0.0.0.0 instance=LAB

/routing ospf interface-template
add networks=192.168.1.0/24 area=backbone type=nbma comment="Transit NBMA (unicast)"
add networks=192.168.5.0/24 area=backbone passive comment="Advertise 192.168.5.0/24"

/routing ospf static-neighbor
add address=192.168.1.253%ether1 area=backbone poll-interval=10s
add address=192.168.1.252%ether1 area=backbone poll-interval=10s
Optional: force A as DR
/routing ospf interface-template set [find networks=192.168.1.0/24] priority=128
2.2 Router B: OSPF config
/routing ospf instance add name=LAB router-id=192.168.1.253
/routing ospf area add name=backbone area-id=0.0.0.0 instance=LAB

/routing ospf interface-template
add networks=192.168.1.0/24 area=backbone type=nbma comment="Transit NBMA (unicast)"
add networks=192.168.2.0/24 area=backbone passive comment="Advertise 192.168.2.0/24"

/routing ospf static-neighbor
add address=192.168.1.254%ether1 area=backbone poll-interval=10s
add address=192.168.1.252%ether1 area=backbone poll-interval=10s
Optional: prevent B from ever being DR/BDR
/routing ospf interface-template set [find networks=192.168.1.0/24] priority=0
2.3 Router C: OSPF config
/routing ospf instance add name=LAB router-id=192.168.1.252
/routing ospf area add name=backbone area-id=0.0.0.0 instance=LAB

/routing ospf interface-template
add networks=192.168.1.0/24 area=backbone type=nbma comment="Transit NBMA (unicast)"
add networks=192.168.3.0/24 area=backbone passive comment="Advertise 192.168.3.0/24"

/routing ospf static-neighbor
add address=192.168.1.254%ether1 area=backbone poll-interval=10s
add address=192.168.1.253%ether1 area=backbone poll-interval=10s
Optional: make C the BDR (more resilience than “no BDR”)
/routing ospf interface-template set [find networks=192.168.1.0/24] priority=1
(If you set B=0 and C=1, then A becomes DR, C becomes BDR.)
3. Verification checklist (run on each router)
Neighbors should appear (A sees B and C, etc.)
/routing ospf neighbor print
Routes should show up via OSPF
/ip route print where protocol=ospf
Quick end-to-end ping tests:
From a VM in 192.168.5.0/24:
- ping 192.168.2.x, 192.168.3.x
Make sure VM gateways are set correctly:
- 192.168.5.x gateway = 192.168.5.1
- 192.168.2.x gateway = 192.168.2.1
- 192.168.3.x gateway = 192.168.3.1
If you ever need to add another router?
Add Router D + new subnet (example: 192.168.4.0/24)
Assume Router D:
- ether1 (transit):
192.168.1.251/24 - ether2 (LAN):
192.168.4.1/24
On router D:
/ip address
add address=192.168.1.251/24 interface=ether1 comment="Transit"
add address=192.168.4.1/24   interface=ether2 comment="LAN behind D"

/ip firewall address-list
add list=LAB_NETS address=192.168.4.0/24 comment="Behind D"

/routing ospf instance add name=LAB router-id=192.168.1.251
/routing ospf area add name=backbone area-id=0.0.0.0 instance=LAB

/routing ospf interface-template
add networks=192.168.1.0/24 area=backbone type=nbma comment="Transit NBMA (unicast)"
add networks=192.168.4.0/24 area=backbone passive comment="Advertise 192.168.4.0/24"

/routing ospf static-neighbor
add address=192.168.1.254%ether1 area=backbone poll-interval=10s
add address=192.168.1.253%ether1 area=backbone poll-interval=10s
add address=192.168.1.252%ether1 area=backbone poll-interval=10s
Update the existing routers (A/B/C)
Add the new subnet to LAB_NETS (A, B, C)
/ip firewall address-list
add list=LAB_NETS address=192.168.4.0/24 comment="Behind D"
Add Router D as an OSPF static neighbor (A, B, C)
On each of A/B/C:
/routing ospf static-neighbor
add address=192.168.1.251%ether1 area=backbone poll-interval=10s
Verify after adding Router D
On any router:
/routing ospf neighbor print
/ip route print where protocol=ospf
You should see 192.168.4.0/24 learned via OSPF and neighbor adjacency to router-id 192.168.1.251.
If you ever need to delete a router?
If you remove Router/Node B (192.168.1.253 / 192.168.2.0/24), you just “unplug it” from three places:
- OSPF static-neighbor entries on the remaining routers
- The LAB_NETS address-list entry for B’s subnet
- Any leftover OSPF routes will disappear automatically once the neighbor is gone
1. On Router A and Router C: remove B as a static neighbor
Run on Router A and Router C:
/routing ospf static-neighbor remove [find where address~"192.168.1.253"]
Verify:
/routing ospf static-neighbor print
/routing ospf neighbor print
2. On Router A and Router C: remove B’s subnet from LAB_NETS (192.168.2.0/24)
Run on Router A and Router C:
/ip firewall address-list remove [find list=LAB_NETS address=192.168.2.0/24]
This keeps “allow LAB↔LAB” and “no-nat LAB↔LAB” rules correct (they’ll no longer include that subnet).
3. Remove B from Router C’s and Router A’s expectations
Once B is gone: OSPF routes to 192.168.2.0/24 will vanish automatically. Traffic destined to 192.168.2.0/24 will stop (as desired).
Verify on router A or C:
/ip route print where dst-address=192.168.2.0/24
/ip route print where protocol=ospf
4. Optionally wipe router B:
/system reset-configuration no-defaults=yes skip-backup=yes
Optional - DR/BDR priorities after removal
If you previously set priorities like:
- A priority 128
- C priority 1
- B priority 0
Then removing B changes nothing — A stays DR, C stays BDR. If you did not set priorities, it’ll still work - DR/BDR will re-elect based on who remains.